
 Setting up Google Publisher is the final step in the 3 step branding process of verifying ‘You’ as Author, all your online Content as Yours, and your website or business as a verified Google Publishing Platform. Linking all these three branding opportunities together, promotes you and your products across the whole Google Plus Social Network system.
This article explains how to implement the third step: Google Publisher, to promote your blog, business or products. Once you have set up your Personal Google+ Profile Account, and have Google Plus Pages set up, you can now set up your Google+ Publisher links. You do that by
- Creating Google+ Pages inside your personal G+ Profile account
- Adding rel=”Publisher” to your website, and then
- Linking the two together.
If you haven’t yet got yourself verified as an Official Google Plus ‘Author’, and increased your traffic by getting your verified Author photo (get one from Gravatar) appearing next to your Google Search Results, do it today. Implementing Google Authorship (with Photo) can be tricky…but…this article:
Idiot’s Guide to Setting Up Google Author
will walk you through all the steps you need to take to crack that particular nightmare…err…no..sorry…that…er…Achievable Goal. Yes! and claim all of your online Content, wherever it appears online.
Add Google Plus Pages to Your Personal Google Plus Profile Account
Before you can apply to be a Google ‘Publisher’, you need to create a Google Plus Page to promote your Blog or Business (not you as ‘Author’). And you have to use your Google+ Personal Profle Account to create Google Plus Pages to promote your blog, website or products through Google Plus.
Check out Google Plus Pages Explained to know how to create Google+ Pages, and why you need them if you want your business or blog to flourish.
Now we can move on, to setting up Google Publisher so that we get extra exposure for our blogs and businesses because our Websites are showing up on the right hand side of Google SERPs.
The Google Publisher Link (rel=”Publisher”) Brands Your Website, Not You
When you add the rel=”Publisher” attribute from your Website to your website’s own Google+ Page, you are branding (claiming) to be the Publisher of all the Content on that website. You have already
claimed to be the Author of all the Content written by you on your site. You did that already with your Personal G+ Account and your rel=”me” and rel=”Author” tags.
Now, you can claim to be the Publisher of all the Content published on your site, whether you wrote it, or someone else wrote it.
Step 1: Create Google+ Pages inside your personal G+ Profile account
I’m going to assume that you already have your Google Authorship and Google Plus Pages all sorted out. See Google Pages & Publisher Explained.
Step 2: Adding rel=”Publisher” to your website.
First the Geeky way – so all you geeks out there can gloat and feel superior to the rest of us….and then the easy way, for normal people. 
The Geeky Way to Add Google Publisher Tag to Your Blog:
This rel=”Publisher” tag, also known as an Attribute, needs to be added to the Header/Home Page of your blog. That way, it will apply to everything within the blog. So, in that way it is easy: one tag, one place. So if you are geeky enough, here’s what you do:
Create your own blog’s publisher attribute like this:
<link “href=https://plus.google.com/YOUR G+ PAGE NUMBER” rel=”publisher” />
My Second Million’s Google Plus Page URL is
https://plus.google.com/u/0/b/109048785636515203651/109048785636515203651/about
so my Publisher Attribute link would be:
<link href=https://plus.google.com/b/109048785636515203651/10904878563651 rel=”publisher” />
OK, there you go!
If you know how to add the rel=”Publisher” attribute to your Home Page, that is what you do.
Me? Not a chance….so… here is the Easy Way to add the rel=”Publisher” attribute tag/link to my Home Page:
Easy Way to Add Google Publisher to Your Blog
With a plugin…of course! Download, install and activate the Yoast WordPress SEO plugin.
You will see a separate SEO link in the left hand sidebar of your WordPress Dashboard.
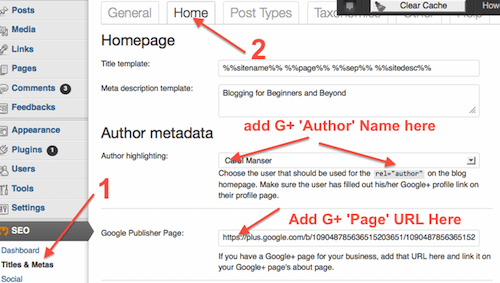
Go to Titles and Metas (No 1), and then click ‘Home’ (No 2) in the top menu.
There is a text box where you must enter your Google Plus Author Name – the exact name that has been verified by Google.
There you will see a text box where you can enter your ‘Google Publisher Page’ URL.
Save: you have now added the Google Publisher tag to your website.
Easy as!
Step 3: Linking Your Blog with Your Blog’s Google Plus Page
1. Go to your Google Plus Page (not personal Google+ Author Account)
2. Go to Profile in left hand sidebar.

3. Add the email address to Contact Information: use the email address you used to verify yourself and your Blog when you set up Google Author.
4. On the right hand side of your Google + Page Profile go to: Links> Website: and add your blog’s URL.
5. Check that you have a small ‘tick’ icon next to your Contact Email address and your Blog URL.
6. Click on the links to test that they go to the correct destination.
Alright! It’s Done! Now we have to test the links with Google’s Rich Snippets Tool.
Testing Google Publisher with the Google Rich Snippets Tool
1. Enter your URL in the text box and click Preview.
2. Check to see your Author Photo appears. Check that you also see the blue byline text: ‘By Your-Name’, and also ‘More by Your-Name’.
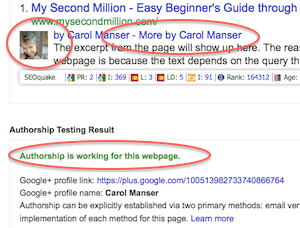
3. Scroll down to Authorship Testing Result and see the green
Authorship Is Working for this Web Page.
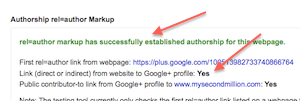
4. Scroll down to see Authorship rel=author Markup:
rel=author markup has successfully established authorship for this webpage.
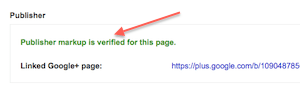
5. Scroll down to Publisher
Publisher markup is verified for this page.
And Home in time for tea……tra la! Good job!!
It might take a few days for your Publisher links to show up in SERPs – we have only tested the links to see that they are working properly – seeing them in live search results takes longer.
Also, remember that the extra Google Publisher information that appears on the right hand side of SERPS, only appears when someone searches for your Blog or Business, not your individual articles. That’s because Google Publisher promotes your Blog or Business, not you as author of Content.
Don’t forget to sign up for regular Updates:
Hey, I haven’t used my Motto for ages!
Cue Motto…….. Plan Well. Start Small. Think BIG!
Hello!
Excellent step by step giude, but I have a question:
by the Personal you mean my own Siegfried’s profile – can I do same thing for my Website G+ Page?
Best Regards
Hi Siegfried, you can’t add Publisher to promote you own personal Siegfried G+ account, because Publisher is for promoting your websites or business, not a person.
‘Author’ verification is for promoting people, not businesses, and you do that with your Personal Siegfried G+ Account. You, as Siegfried, are an Author, which means you can claim all your written Content wherever it appears online – and get your photo appearing in SERPs. Here’s the link that explains how you can do that: Idiot’s Guide to Google Author.
So if you want to implement Publisher to promote your BLOG, you must first open your Personal Siegfried G+ Account, and then create a Page for webthesmartway, from inside your Google Plus Personal Siegfried Account.
Then you link that G+ PAGE (business page) with your website where you added the rel=”publisher” link – probably by using a plugin unless you are geeky enough to do it manually into your header.
Excellent, thanks for this! Just to let you know, without the plugin people can simply put the line of code in their header file… but there is a slight typo in what you have above: the first ” is in the wrong spot, instead of <link “href=https: it should be Cheers!
Hi JJ, thanks for the tip – I’m always happy to know about any glitches. Yes, adding a line of Code into your header file is one way to do this, but most newbie bloggers don’t know how to do that. Vegan Chai Pumpkin Latte????? Are you kidding? 🙂
Thank you very much for this useful tutorials. Couple of days ago I receive a message from Google Plus Team to my publisher account. I also use Yoast WordPress SEO so this is a Win/Win situation 😀
Well done Catalin! Glad you found it useful.
Very useful Blog. Whether is it possible to add publisher name and picture in blogger?
Sorry – I don’t know much about Blogger.
Great tutorial. I have done the publisher markup using Yoast. But, it is not displaying. I think the update process takes time. I’m I right?
Hi Akhil, I’m not sure about the Yoast way – has it come good yet?