
 The technique of Blacking out parts of screenshots and other images is called Redaction. Being able to blackout, or redact, parts of an image is easily done with the Preview App that is always shipped out on all Mac computers.
The definition of Redaction is a General term for preparing a document for publication. For bloggers (and the CIA  ), redaction means to grey out ‘sensitive’ info you don’t want other people to see.
If you need to upload screenshots into web pages, you will need to know how to blockout text, or parts of images that you don’t want other people to see.
Redaction is also sometimes known as Greying Out, or blocking out, parts of images or text. Blog owners often need to add screenshots into their ‘How To’ online articles to demonstrate how to do particular tasks online.
Usually, bloggers use screenshots that are taken from their own computer screens. If the screenshot shows text or data we don’t want other people to see, we need to be able to black it out – to redact it, from the screenshot image.
If you use a Mac computer, you can do this redacting by using the Preview App that comes with all Mac computers. Mac’s Preview app makes greying out text from images really easy. The Preview app also makes the taking of screenshots really easy.
There is another down-loadable app called ‘Grab’ that can also be used to take screenshots as well. Mostly I use the Preview app…because it’s always there.
First, I’ll quickly explain the best and easiest way to take a screenshot with a Mac computer using Preview.
How to Take Screenshots on a Mac Computer
Once you have the relevant screen showing on your computer, go to:
- Finder>Applications>Preview
- Or click the Preview Icon in your Dock.
- At the top of your screen, click on File in the top horizontal menu.
- At the bottom of the drop down menu, hover your mouse over the text ‘Take Screen Shot’
- You will see a choice of
- From selection
- From window
- From entire screen
6. For maximum control over what you include in your screenshot, choose ‘From Selection’.
7. You will briefly see a message that says:
8. “Drag the cross hairs over the area of your screen you wish to capture”
9. And you will see on-screen a tiny cross hair, ‘sputnik-y’ kind of a thingy – a technical term.
10. Move your mouse to the top left corner of the area you want to capture in your Screenshot.
11..Make a left click and keep holding the mouse down.
12. Drag the cross hairs across and down, so that the area you want to capture is within that cross hair square.
13. Release the mouse button.
You will hear a very satisfying ‘Click’ as if you have used a real camera to take a photo – Apple always has cool ways to make you feel clever.….but I digress…
The screen shot you have captured will now be displayed as an image file on your screen.
Save your screenshot to your computer by going to Preview>File>Save.
Here is a screenshot of my Newsletter sign-up form that I just took from my Home Page.

Great, now lets try to black out (redact) some text on that saved image.
How To Black Out a Part of an Image File Using Mac Preview.
- Open your screenshot image in Preview
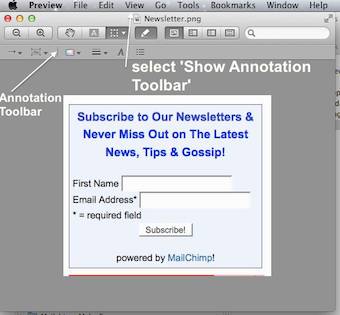
2. If you haven’t done it already, go to Preview>View in the top menu bar, and
3. Select Preview>View>Show Annotation Toolbar.
3. Make sure you can now see the Annotation Toolbar.
4. Go to the top menu bar and click Tools
5. Find ‘Annotate’ in the ‘Tools’ drop down menu and hover your mouse over ti.
6. Select Add Line – it’s the 3rd option down on my Mac
7. Go to the Line Selection Tool in the Annotation Toolbar 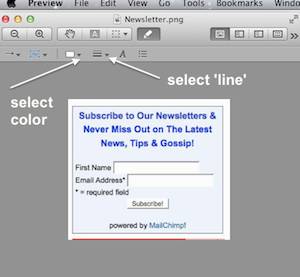 –
–
it’s the option which is shown as several horizontal lines.
8. Select the thickest line from the drop down menu..
9. You will see a small Cross-hair appear on your screen..
10. Click and hold your mouse down at one end of the text you want to black out (redact).
11. Drag your mouse across the text (or anything) you want to black out (or red-out in this case)
12. Release your mouse.

13. Yay! High fives all round! ……high fiving with the dog will do at a pinch – Bonus Tip: I find trying to high five with the cat is much less rewarding.
14. Save your you-beaut redacted image to your computer.
15. Optimize your Image: see How to Optimize Images for Max Speed & SEO
16. Upload your redacted and optimized image into your article.
All done. Good job! Time for some well earned chips!
If you haven’t done so already, sign up for our Newsletter and always keep up to date with all our latest news and gossip. Just click HERE to subscribe – and of course…it’s FREE
Pingback: How to Set Up Google Alerts & Optimize for Power Tracking
I would like to appreciate for the particular initiative you have given here in providing an essential an useful information through your post. great!!
Thanks, Kanagavalli
THIS IS A VERY COMMON MISTAKE!!!
This is not the proper way to redact a pdf. Any editing you do in Preview can simply be removed by anyone in adobe. In adobe, you have the option that removes all hidden information and editing. I’ve seen people accidentally send out their entire bank info accidentally bc of this type of advice.
Hi Tim, I did not know that about redacting in the pdf format – it’s good to know. This article is really about redacting from screenshot images, not pdf. There was one reference to pdf at the start of this article, but I have now removed it. Thanks for your tip.
I believe I solved the problem…and you could make a new article with this information and keep from having people correcting you.
In the newer versions of Preview (I’m not at the newest version, but within the last couple years) — you go to TOOLS –> ANNOTATE –> HIGHLIGHT TEXT
Change the color to BLACK…and then HIGHLIGHT ANY TEXT YOU WANT “GREYED OUT”
When you save the PDF, it appears that the highlighting is permanent, so people can’t see your information. Should solve the problem the previous poster mentioned.
Thanks for that Mike. I do have a Preview version that includes Highlight Text. I’ll experiment on a pdf and maybe write an article on it. I do think that most bloggers are more interested in blacking out things in screenshots, because that is what we use all the time when publishing articles with images. But I also think there are lots of others who want to be able to do this with PDF’s.
Thanks for the tip!
Carol
You can also screen shot the redacted pdf to make sure the text underneath the redactions doesn’t come through.
Exactly, Ted! This article is about redacting anything from screenshots and it doesn’t matter at all where that screenshot actually came from.
To clarify, what I meant was that when I have a off if my bank statement, I can put black rectangles over the numbers I want to obscure, but the numbers can still be selected if I just save that PDF. What I can then do is make a new screenshot of my redacted PDF and since that’s just an image, the underlying numbers cannot be found.
Thanks Ted, I did understand what you said, but clarification is always good – that is a very useful tip.
Hi Carol, thank you so much for this article. I needed to quickly find out how to block out text on my screenshot and I just followed your instructions step by step and did it perfectly in less than 5mins!! Much appreciated.
Hi Carolyn, it’s another of those ‘easy once you know how’ things.
Hey,
i’ve recently found this quick tool to redact your screenshots right in your browser using Redacted.com.
Just open the screenshot, click and drag over parts of the screenshot you want to sanitize and that’s it. Hope it’ll help.
That’s interesting Derek, but I would worry that you have to upload your image with visible personal identity data onto their site before you can redact it using their software.
I know they say they don’t keep your sensitive data on their site, but in the current identity theft world, I would not trust the word of a website I do not own. Therefore I would always prefer to do the redacting on my own computer where I know it is safe from prying eyes or prying software.