
 Adding Gzip compression to your website is one of the best ways to speed up your Page Loading Speed. OK, many bloggers know this, but wait! When Beginners and Non-Geeks (like me) do a Google search to find out how to Compress their data with Gzip, they run headlong into a BIG problem: You have to dive under the hood of your website and tinker with vital parts of your website’s data base.
If you would rather use a Plugin to do your gzipping for you, and also Cache your website data as well, my next article will walk you through Installing and Setting up the W3TC Total Cache plugin. It will be live in a few hours from now..hopefully.
Every ‘How To’ website that explains how to add Gzip is full of dire warnings such as: Do Not Make a Mistake! You could lose access to your whole website! Scary stuff, indeed.
However, I will now show you how anyone can add Gzip Compression to their website, and live to tell the tale. Yes, you have to be careful, but you don’t have to be Einstein either. Here is what you do:
How to Safely Install Gzip Compression to your .Htaccess File
1. Make sure all your plugins, themes and WordPress versions are up to date.
2. Backup your website via your Hosting Company’s Backup options – in case of accidents.
3. Make sure you don’t already have gzip installed…I know, but check anyway: Gidnetwork is a good place to check – look for gzip test.
4. Find out from your Cpanel (or ask your Host), if you are using Apache (most sites use this) or IIS or something else.
Assuming you are using Apache: this is what you do:
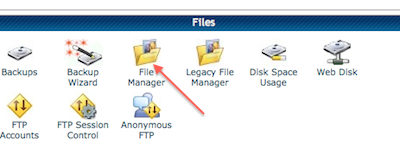
5. Go to your cpanel main screen.
6. Look for the section called Files.
7. Look for the icon called File Manager. Click on the File Manager icon.
 8. You will see a screen something like this:
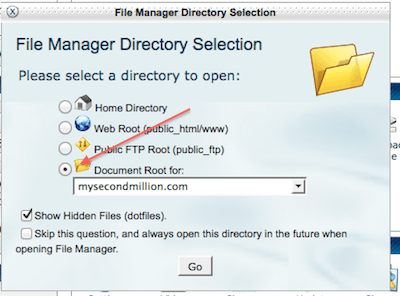
9. Make sure you check the box: Show Hidden Files. Checking this box gives you access to the file that you will need to change.
10. Select ‘Document Root For’, and the website name which you will be compressing. This will take you to exactly where you need to be in your database.
11. Click ‘Go’.
12. You will now be looking at your Home/public_html contents screen.
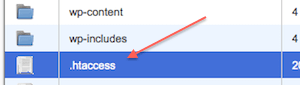
13. In the main window of the screen, look for the file called .htaccess. The dot in front of the name indicates that this is an important file – I thought I’d just scare you a little, he he....
14. Select this file by clicking on it.
15. Look at the top of the screen for the ‘View’ icon and click on it.
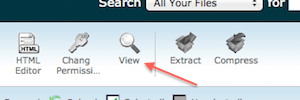
Now you will be looking at the contents of your .htaccess file. This is a very important file, and the file that all the oooh aah fuss is about….but don’t be scared! It is true that if you mess up this file, you can really get into access trouble. This file controls your access to everything, period. Be careful, but not afraid. Why? That’s easy:
Because you will now copy/paste the full contents of this pristine, fully functioning .htaccess file before you do anything else.
16. Save it to a Text file format: for example, Notepad on PCs or Text Edit in Macs.
Note: You have to save your .htaccess file to a Text file (not Word) format because a Text file will retain all the original HTML formatting. This is important because, if anything goes wrong, you can easily upload this fully functioning, and properly formatted, Text File back into your .htaccess file to restore it to its previous (and fully functioning) glory. This saved copy/pasted copy of your .htaccess file is your Get Out of Jail Free card. Keep it somewhere safe on your computer.
Make 2 copies if you like – I did, and save it with a title that labels it as your ‘working ok htaccess file’ or similar – in case you need it in future and have forgotten which of your files was the ‘known to be good’ one. OK, seat belts are secured….
17. Have a look at your htaccess file copy in your Text file (to avoid accidents with the real one), and see how it is laid out.
You will probably see one or more blocks of Code.
You will probably see (at least) some WordPress related data which starts with # Begin WordPress, and ends with # End WordPress.
You may see other code there as well, but it will always start with # Begin something, and end with # End something.
18. Alright! Now we have to add some code to the .htaccess file. But where?
Do not paste the new gzip code between the Beginning and end of the WordPress code, or any other sections/blocks of Code, if you have more than just WordPress there in your htaccess file.
For example, I had some S2Member plugin code there, plus a number of my Redirects which I had previously done from my Host’s options panel.
Add your gzip code either above or below other blocks of code, but above any Redirects that you might already have there.
Note: there are 2 different sorts of gzipping:
- mod_deflate – said to be quickest, easiest and ‘standard’ method.
- and mod_gzip: said to be more powerful but also more problematic.
I will show you how to add the Deflate version of gzipping.
19. Copy and paste this code below into a new Text file on your computer e.g. Text edit or Notepad and save it (for future reference).
# compress text, HTML, JavaScript, CSS, and XML
AddOutputFilterByType DEFLATE text/plain
AddOutputFilterByType DEFLATE text/html
AddOutputFilterByType DEFLATE text/xml
AddOutputFilterByType DEFLATE text/css
AddOutputFilterByType DEFLATE application/xml
AddOutputFilterByType DEFLATE application/xhtml+xml
AddOutputFilterByType DEFLATE application/rss+xml
AddOutputFilterByType DEFLATE application/javascript
AddOutputFilterByType DEFLATE application/x-javascript
# remove browser bugs
BrowserMatch ^Mozilla/4 gzip-only-text/html
BrowserMatch ^Mozilla/4\.0[678] no-gzip
BrowserMatch \bMSIE !no-gzip !gzip-only-text/html
Header append Vary User-Agent
18. Go to your open cpanel htaccess file.
20. Copy paste the code from your saved Code Text File on your computer, between any 2 blocks of Code already there. Mine is located after my S2Member Code block and before my WordPress Code block.
21. Save – if you cpanel requires actual ‘saving’. Otherwise, go to a different open web page with your website already loaded and click Refresh……fingers crossed……Yay! Website is still there! What? That’s already an achievement…
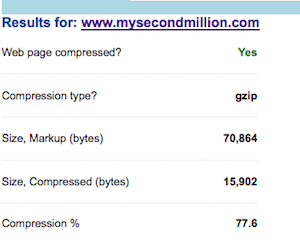
22. Now Go to Gidnetwork’s gzip testing tool and enter your domain url:
Here’s one I prepared earlier….
Tra la! There you go. BUT… if you would rather use a plugin to do all your Gzipping (plus caching) all in one go, wait a few hours for my next article on….How to Install the W3TC Cache Plugin.

Pingback: Beginner Guide: Install & Set Up W3Total Cache With GZIP
Thank you for this easy to understand guide. Perfect!
Thanks Michael, I do strive for perfection….mostly!