
 We all want a fast website – the faster the better. Does your website feel like treacle? The most effective way to speed up your blog is by compressing your database with GZIP compression, and Installing a Caching Plugin. The W3Total Cache plugin does both of these jobs, all in the one plugin. Every website needs to add Gzip compression and also Caching. Why? Because adding these two extras to your website can cut seconds off your page loading speed time. So, this W3Total Cache Plugin is an all in one speed machine, that kills these two geeky birds with one stone.
If you’ve done any online research, you will already know that the W3Total Cache plugin is the best, the fastest, the most effective, and the most complicated Cache Plugin to install. BUT, in fact, it is not difficult to install at all, once you know how to do it safely.
For a long time I have avoided using this Cache plugin with Gzip because all the ‘How To’ sites and Review sites say that this caching plugin is too complicated for non-geeks. This is not true! It is not difficult – it really isn’t. Anyone can do it, they really can!
This article will lead you safely through all the steps you need to take to successfully make your website fly!
It will show you exactly how anyone can easily install and setup this W3TC Total Cache Plugin, even if they know nothing about HTML, or Code, or CSS or any other geeky stuff at all. Even beginners can do this!
As I said before, this Total Cache Plugin includes database Gzipping – which is the other big geeky headache for non-geeks. But if you want to install and enable Gzip Compression on it’s own, without using the Total Cache plugin to do it for you, check out How to Install Easy Gzip Compression for Beginners.
Before you install the W3Total Cache plugin, you need to check that it is compatible with your Theme. Check in your Theme’s Help section, or ask the makers of your Theme, if you are not sure.
The Weaver II Theme which I use, is compatible with 2 Caching plugins: the Quick Cache Plugin and the W3Total Cache plugin. To see how to install and set up the Quick Cache plugin, see How to Install the Quick Cache Plugin.
How to Do an Easy Install of the W3Total Cache Plugin.
1. Make a backup of your site via your Host’s backup options, or by any other means.
2. Make a copy of your current (and working) .htaccess file. If you don’t know how to do that, see How To Install Gzip Compression for Non Geeks for detailed instructions. Keep this .htaccess file copy somewhere safe on your computer – it’s your get out of jail free card, in the unlikely event that you might need it later.
3. If you already have a Cache plugin installed, deactivate it, and delete it. I deleted my Quick Cache plugin, and was asked if I wanted to delete all the files associated with that plugin: Yes, delete them all. You don’t need them, and they will interfere with your new W3TC plugin.
4. If you have had to delete a previous Cache plugin, make another copy of your updated .htaccess file and keep that one safe on your computer too.
5. Download, Install and Activate the W3Total Cache Plugin using the Plugins>Add New option on your WordPress Dashboard.
6. You will see a new item called Performance in your Dashboard left hand sidebar.
How to Set Up and Enable the W3Total Cache Plugin
Go to the first option in Performance: General Options.
General Options.
1. General: when you first download W3TC, you will see a Preview Mode>Enable (green) button.
2. Click ‘Enable’ and ‘save all settings’ – The Enable button will change to a Disable button, and now you will see the functioning Preview button option appear next to the right of the Disable button.

3. Click this Preview button after every tweak you make in the W3TC set up. This is the Golden Rule! Whenever you make a change in the Setup process, click ‘save all settings’, and then Click Preview to make sure your website is still OK – looking same as usual i.e. not scrambled – yes, once again, I made the stupid mistakes so you don’t have to…..
4. This cautious, step wise procedure will immediately show you if any tweak you make has scrambled your website in any way. If it has, don’t panic – just un-tweak whatever you just did, Save all Settings again, click Preview again, and you will see your website restored to it’s former Glory. Phew – yes, I did this twice, but further on, I’ll tell you what caused these problems for me.
When you first click ‘Enable’ you will also see that a ‘Deploy’ button has appeared next to the Preview Button. Don’t click ‘Deploy’ until you are happy that everything is set up OK and you site is looking OK too. Then you are ready to set W3TC loose on your database…. I’m just kidding – yes it feels scary, but you know it’ll be OK because you have checked it with the Preview option after every step.
Make sure you stay in Preview Mode: that means the tab will showing the green ‘Disable’.
None of your tweaks will be applied to your site until you click Deploy. And even after you click Deploy, you can still make further changes, Preview, and then click Deploy again to apply them to your blog. See? No risk at all. Everything is reversible.
This General Options section gives general options only, and the detailed options for each section are reached via the left hand sidebar. Settings saved in the General Options section will affect the tweaks that are active (available to be clicked) in the more detailed Side bar Index of sub-sections.
To save time, I will just tell you which settings worked for me, and what I found out by research: General Options continued:
2. Page Cache:
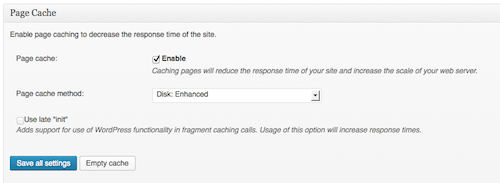
- Enable and
- keep Disk: Enhanced
- Save all settings
Check with Preview. All OK? Good, keep going.
3. Minify:
If you are using Weaver II, don’t enable Minify. This is important for Weaver Theme users, because we have to disable JavaScript Minify, other wise it will scramble the Weaver JavaScript files – which are minified by Weaver Theme itself anyway.
Even if you do not use the Weaver II Theme, most authorities say you should NOT enable Minify because it is not compatible with all Server Settings. Hostgator specifically recommends to leave Minify as Not Enabled.
Personally, I believe that they know more about Minify than I do, so I did not enable Minify. I did check the Minify Mode to Manual for extra tweaking in the Minify advanced section.
4. Database Cache:
Again, many Host’s recommend that you keep your Database Cache turned OFF. Apparently it puts a big load on your Server and the speed benefits are questionable. I recommend that you set up everything else first, and then try out to see how Enabling your Database Cache affects your speed, and your website. Then decide if you want to enable it, or keep it as OFF.
5. Object Cache:
I have this Enabled, and I left the Default Setting of Object Cache Method: ‘Disk’. Check with Preview: it was OK for me. Continue.
6. Browser Cache: was Enabled already, for me. Check with Preview: it was still OK for me.
However, one option in the Browser Cache advanced options (Left hand sidebar access) DID scramble my website…but luckily for you, dear reader, I make the stupid mistakes so you don’t have to, once again….Gory details below….
7. CDN
Leave as Not Enabled – this has advantages and possible risks – do not enable it unless you know what it will do.
8. Reverse Proxy
is an extra add-on: do your own research and decide if you need this or not. I do not have it enabled on this site.
9. Cloudflare – leave as Not Enabled – this has advantages and possible risks – do not enable it unless you know what it will do.
10. Monitoring with New Relic (free account) – I decided to decide later.
11. Miscellaneous:
Enable Google Page Speed – this was already enabled by default – I left it enabled because it wasn’t crashing the site when checked with Preview. You do need an API Key: The plugin says:
To acquire an API key, visit the APIs Console. Go to the Project Home tab, activate the Page Speed Online API, and accept the Terms of Service. Then go to the API Access tab. The API key is in the Simple API Access section. This was already Enabled but with no API key yet. I left it as it was, for now.
12. Debug:
The Plugin says: Detailed information about each cache will be appended in (publicly available) HTML comments in the page’s source code. Performance in this mode will not be optimal, use sparingly and disable when not in use. Leave it OFF, and use it only if you need to check something later.
13. Import/Export Settings:
- allows you to import previous Active Settings File
- download the Active Settings File
- Revert all settings to the defaults
This option is handy for when you have everything set up and you want to save your Plugin Settings for future reference.
Summary So Far
We now only have to tweak Page Cache, Object Cache, and Browser Cache, because Minify, Database Cache, and the other extras are Not Enabled.
How to Set Up W3Total Cache Plugin: Page Cache.
Remember to Save all Settings and check that all is still well using the Preview tab after every tweak. These are the Settings that worked OK for me: Hold onto your hats, ladies and gents…we’re going in……
1. Page Cache: General: access from Left hand sidebar:

- Cache Front Page: Enable. Check with Preview.
- Cache Feeds, site, categories, tags, comments: Enable. Check with Preview. Good.
- Cache URIs with query string variables – for some reason this option will not ‘enable’ for me. Don’t know why – it doesn’t seem to matter.
- Cache 404 Pages: it says “Use at own risk” Are they kidding? No way I’m risking anything with my blog. Some geeks I asked, also say you should leave it unchecked. So I did.
- Cache Requests only for My Second Million: Enabled. Preview. Still good.
- Don’t cache pages for logged in Users: was already enabled. I left it checked.
2. Cache Preload:
- Automatically prime the page cache: Enable, I left the default interval settings – 3,600 seconds, and filled in my
- Site Map URL –
- check the Prime post cache on publish. Save all settings. Preview? All good.
3. Purge Policy: I left everything as Default.
4. Advanced: Listen up, Weaver Theme Users! this Section is important!
a) Compatibility Mode: I enabled this. The Plugin says: Decreases performance by ~20% at scale in exchange for increasing interoperability with more hosting environments and WordPress idiosyncrasies. This option should be enabled for most sites. Preview? Still good.
b) **Rejected User Agents – Important for Weaver Theme Users!
Copy/paste Weaver’s list of Mobile devices to be excluded from Caching. The list can be found at your Weaver Admin: General Options>Help>W3TC Cache:
This has to be done to allow the Weaver theme to load accurately onto Mobile devices. Yes, the loading will be slightly slower on Mobiles because the data is not cached, but the data and content will be accurate (not scrambled or with data missing).
I left all the other default settings as default.
Save all settings. Preview? Yes, still hanging in there.
W3Total Cache Plugin: Object Cache.
Enabled: We enabled that before, in the General Options Section.
I left everything as it was, but increased the Cache Times as follows: here’s a Math cheat sheet:
- 60s x60m x 24 = I day = 86,400 seconds in one day
- 86,400 x 30 = 2,592,000 seconds in one month
- And 31,536,000 seconds in one year
- Default lifetime of cache objects: 604,800 seconds
- Garbage collection interval: 3,600 seconds.
W3Total Cache Plugin: Browser Cache
The Browser Cache is where you will see the Gzip Settings. Check them all.
1. General:
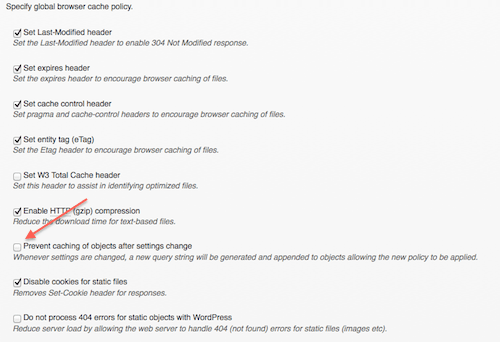
Important: Enabling the ‘Prevent caching of objects after settings change’ scrambled my blog’s structure totally. Try it out if you like, but be prepared to see a scrambled website. If you uncheck it again, the website returns to normal – well it did for me.
I also left the Page 404 unchecked, as recommended by the plugin, and enabled all the other settings without mis-hap.
2. CSS & JS (remember that we have already made Javascript Minify to OFF in General Settings).
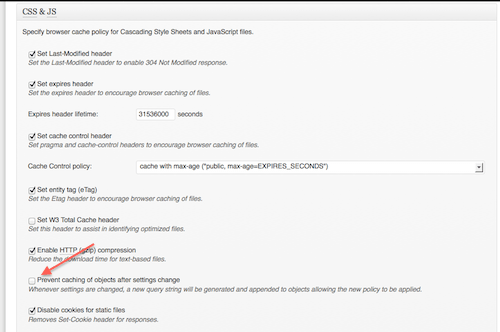
I Enabled everything except the same problematic ‘Prevent caching of objects after settings change’ which scrambled my Theme, so I left it unchecked. Preview – Still looking good.
I set Expires header lifetime: to 31,536,000 – one year.
3. HTML & XML:
All checked. Save. Preview: still looking good.
4. Media & Other Files
I set Expires header lifetime: is set to 31536000 seconds.
All checked (enabled) except the ‘Prevent caching of objects after settings change’ which scrambles my site. Preview? Still looking good.
I didn’t do anything with the other options on the left index. Mostly they were not enabled in the General Options section anyway.
Check Preview one last time…all good? Hit ‘Deploy’! Bombs away! Tally Ho!
Next job is to go to the GTMetrix website, run a test, and fix all the things that still need fixing: they tell you exactly what they are, where they are, and how to fix them. There will probably be quite a lot of things to fix – but fixing them will speed up your site, even more.
Once you have these basics for the W3 Total Cache set up, you can go through your settings again, and experiment with setting different Cache refresh times, or turn different options on and off, Preview, and Deploy if they don’t scramble your site. Then re-test your Page loading speed.
Each site is different, and each Theme is different – so do some trial and error testing to get the best fine tuning for your own website.
Wow! What a monster article. Done and dusted – go on, spoil yourself (with your own personal temptation of choice) for a job well done!

Love you so much for this article.
I have deployed exactly as you said. And the result is already showing in terms of numbers from various analysis.
Amazing. I am glad you exist.
Regards
Soumen
Steady on, Soumen! To be honest this comment looks like spam, but, I checked your site, and you do have the W3Total Cache plugin installed, so I have to believe that this is a genuine Comment. So thank you – and you do have beautiful photos by the way.
I dont know why this looked like a spam to you.
I am a total novice. I have built the website without knowing anything about HTML and CSS etc. I have used a lot of your blogs earlier as well. Then one of the analysis suggested to implement gzip. And after a little browsing I discovered your article on W3TC. The way you have given step by step instructions, it became a cake walk for a novice who does not want to invest much time on site building. My area of focus is Photography and not the website. However I need the website as a tool for marketing.
That is why your step by step guide helps me. I dont need to do research and yet get the desired results.
I am poor in marketing myself. Dont know what else to do. But I sure benefit from your blogs. Thanks again.
Hi Soumen, I hope you were not offended by me saying your Comment looked like spam – I did not mean to offend. However, can I make some suggestions?
If you want your Comments to be published and not thought to be spam by fellow bloggers, saying things like ‘Love you so much for this article’ immediately alerts most bloggers to a spam comment.
Maybe it is a language difference? Saying you love someone is something a native English speaker would only say it to our wife/husband, mother/father, or children.
Generally speaking it is always safer to say you loved the article, not the writer of the article.
If a Native English speaker want to express their appreciation of an article (and not land in the Spam Folder) they might say things like, ‘I really loved this article because….etc’
or maybe ‘This article has been really great for me because…etc’
or maybe ‘Thank you so much for this article, I followed your instructions and it worked brilliantly for me – I installed the W3Total Cache plugin and it really works!’ Thanks for explaining everything so clearly……etc’
Also at the end of your Comment you said, “I am glad you exist’ which is probably also a language usage difference. A native English speaker might say, “I’m glad I have found your website’ or something like that, which is less personal. Again it is safer to love/like/appreciate the article or website, rather than the writer of the article.
The other thing that Spammers do is they do not refer specifically to the article they are Commenting about. They deliberately write a comment that could be applied to any Comment anywhere – therefore they type something non-specific, so they don’t have to bother to read the articles they are commenting on.
You did not mention the W3Total Cache specifically by name, so this Comment could have been written by someone who had not even read the article – a common spam feature.
However, because you referred to numbers, and analysis, I wondered if you might be making a genuine Comment about installing this plugin.
So I went to check out your website, right clicked and selected View Page Source, scrolled down to the bottom looking for green text, and found that you did indeed have the plugin installed.
Then I saw that your website was professional looking (not just a sales page) and that English might not be your usual language, and so I decided that you might not be a spammer after all.
So I published your Comment although I was still not 100% certain about it.
I hope that helps to explain why I thought your Comment might be spam – I know it is difficult to recognize the give-away signs of spam until you have seen a few thousand of them, but there are certain common features that signal SPAM to most bloggers when they have a bit more experience of it.
I do try to make allowances for foreign language Commenters, but sometimes it is not at all clear who is genuine and who isn’t.
If you want to read more about how to make Comments that will get published and not land in Spam Folders, check out my article How to Make Brilliant Comments.
I also have a whole Category called Spam and Anti Spam Plugins
On any other day, I might not have taken the trouble to go through those checks on your Comment – you would have been tossed into the spam folder and you would never know why your Comment was never published, and visible in my Comments section.
So I hope this comment will give you some tips on how to avoid ending up in Spam Folders when you are not a spammer, and are making a genuine Comment.
I forgot to say that if your second comment had been your first one, I would never have wondered if you were a spammer.
Your second Comment was a perfect Comment – and thanks for your nice complements about the article.
Carol,
I am not at all offended. Not a little bit. I understand diversity of cultures and the necessity of “Diversity Inclusion”. I learn quickly and adopt fast. Apologise for the inconvenience. The intention was not to get my comment published, but to express to the author how much I have been helped by this article.
In fact I have book marked your site for further references and am very thankful to you.
I came back to ask you about another issue that I faced. Thought you might have some insight or another blog that I am not able to find.
So here is the issue.
When I use this link to analyse my site,
http://developers.google.com/speed/pagespeed/insights
it gives a red alert and this is what it says :
Eliminate external render-blocking Javascript and CSS in above-the-fold content
Your page has 15 blocking script resources and 7 blocking CSS resources.
Any means to sort this thing out? If we can sort this out, it will make the site a little more faster. Keeping in mind that I have W3Total installed, I am not sure if I can venture out with more plugins which may interfere with my current setup.
any suggestion will be helpful.
Thanks and regards. 🙂
Soumen
Hi Souman, I wish I knew – I get the same feedback from Google Page Speed Insights.
Suggestions:
1. You could do an ordinary Google Search to research how to fix that.
Or,
2. I know these guys Tweaky fix up this sort of thing and you go to Tweaky and request a quote.
I think their prices start off at $39 for easy jobs.
Pingback: How To Make Money Blogging – Create a Blog That Runs On Its Own