
 The new Thrive Content Builder Plugin has been available for 3 days now. There are only 2 more days before the discount Launch price of $47 dollars closes. In my previous post I explained the benefits of this plugin for building Posts and Pages with visually based, true ‘what-you-see-is-what-you-get software.
Update: the closing time for the special Launch price of $47 has been extended to midnight on Tues 18th Feb. Update update (!) the Thrive Content Builder is currently retailing for $49 single site license, and $67 unlimited site license.
Today, I have successfully used the Thrive Content Builder to create my first Landing Page. I have never used a Content Builder of any sort before, and I definitely need to improve my driving skills – and get to know my way around the plugin’s features. It is a new learning curve for me, but I did successfully install, activate and build my first Page using this plugin in 20 minutes. Not a great page, by any standards, but it was a page, and it had 3 columns, some text. and a Call To Action box.
Here is how I did it:
How To Install and Activate the Thrive Content Builder Plugin
After you purchase your plugin, you get access to the Member’s area of Thrive.
Go to Thrive>Members>and login
Go to ‘My Account’ – there you will find your account details and your Activation Key number.
In your WordPress Dashboard, click Plugins>New and upload your new plugin in the usual way: That is as follows:
1. Find the ‘Upload’ a plugin button at the top – not the search for new plugin option.
2. Click ‘Browse’, and navigate to where you saved your downloaded Thrive plugin, and select it by clicking on it.
3. Click ‘Open’, and your Thrive plugin will be uploaded into your New Plugin screen in your WordPress dashboard.
4. Click ‘Install’
5. Click ‘Activate’ for the plugin while still on that New Plugin screen.
6. Go to your WordPress Dashboard left hand sidebar and click ‘Settings’
7. Find the Thrive Plugin listed in the drop down menu and click on it.
How to Validate & Activate Your Thrive Content Builder Plugin License
You will see a screen asking for the Thrive Plugin Validation email address (the one you used to buy the plugin) and to Enter your Activation Key number. That’s the number you found in your Thrive> Members>’My Account’ page.
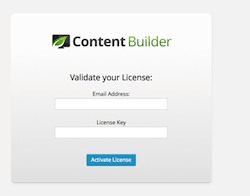
Click Validate….OK, I thought about crossing my fingers at this point, but there was no need. My validation went through OK.
This is what you see: 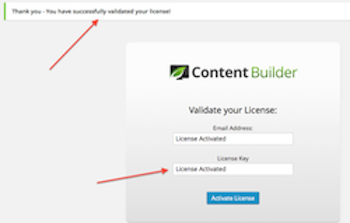
Success. I’m now validated. Now you click on that blue ‘Activate’ button. OK at this point I really did cross my fingers….and… Success!
Alright…deep breath…go to New Page and open a new page – the plugin works with Pages and Posts but I thought I would kick off with Pages because that is the traditional use for Content Building Plugins. I decided I would test the Post options afterwards if all went well.
What did I see on my New Page…???
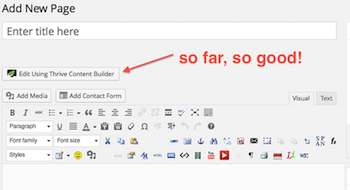
Here you see that I got a normal, blank, new WordPress Editing Page, but now with the all-important addition of the: ‘Edit Using Thrive Content Builder’ button, above the block of Formatting buttons.
So I typed in a Title for my new Page, clicked Save, and then clicked the ‘Edit using Thrive Plugin’ tab…..
Ha! I got a new page that had my Title at the top, and the Thrive Content Builder Option panel, visible down the right hand side. Success!
I did a bit of a test drive….I soon found out that I definitely need L plates for this, having never used a Content Builder of any sort before.
I also soon realized that you have to ‘Save’ everything you do as soon as you do it, or else, when you try to add something or change something more…your previous stuff has disappeared somewhere. I’m sure this was due to driver error and/or inexperience.
The Undo and Redo buttons did work, but I still have to get used to using the controls of this plugin. I was on a learning curve here with my first test drive as a complete beginner with Content Building software. But I still managed to successfully build a page, and save it, by trial and error, within 20 minutes, and with no crashes.
Some Things I Learned on My First Thrive Page Build
I worked out that every time you click on the Edit page, you get a new text box to write in, which becomes hidden if you don’t write anything in that text box – but it is still there. Before you realize this, you find you have big blank spaces between elements that you did write in. At first, I couldn’t work out how to get rid of these spaces.
But that’s easily fixed once you realize why you have those big blank spaces there – you can un-hide those boxes by clicking in that space again, the empty text boxes appear again, and then just delete those unfilled boxes by clicking the big X at the edge of each text box. Then the text that you did write and save, moves up to fill the unwanted space, and you get normal spacing and paragraphs. L driver inexperience again.
I haven’t figured out yet how to change the background color of text boxes, or how to move anything around on the page. Which is not what I expected! However, I had only been test driving this plugin for 20 minutes, and I’m sure I’ll get the hang of all it’s options with more practice.
Whenever I clicked ‘Save’ button at the top of the Thrive Options sidebar, there was a nice little green ‘All changes saved’ button that slides out briefly from the left of screen. Nice.
How To Save Your New Thrive Landing Page
Now…here is the tricky bit….it turns out that there have been some people saying they are losing their Content when they try to continue editing on their page when they click on the Edit button. Which would be a problem, to say the least! Because you have to be able to save what you’ve already built in your Draft Page, see how it looks as a View Page…. and then be able to get back to it again in the WordPress Edit Page that has the Thrive Options visible down the right hand side, so you can continue to work on it.
In fact, this exact problem had already happened to me every time I clicked the Edit button (but I soon worked out how to do this step successfully – see further below):
Even though I had ‘saved’ my work, when I clicked ‘edit’ to add more elements, I kept getting the WordPress drop down menu saying
‘Do you really want to leave this page? You may lose some of your data’.
But I seemed to have no choice if I wanted to continue to work on my Page. So when I clicked ‘yes, leave this page’, I got taken back to the Editing page, but all my text and columns etc were gone forever! Not good!
So then I tried a different approach…Bonus tip for young players: if at first you don’t succeed, don’t throw a tantrum and trash the neighborhood….my mom told me that…but I digress….
How I Saved My Page & Then Successfully Got Back To The Thrive Editing Page
I clicked ‘Save’ at the top of the Thrive options column. Then I clicked ‘Preview’ at the top of the Thrive options column…and I got taken back to my Page as it would be seen if I had published it already i.e. this is exactly what happens in the standard WordPress Preview system.
So now I was seeing the Draft Page, but in the Wordress only Pages, with no Thrive options visible (because I was Previewing the Page, so it was not an ‘Editable page’ of any sort). But the work that I already had done, was still there on the page.
OK. Now all I had to do was get this Page back into the Editor Page… with my Content still intact, and the Thrive plugin options column showing down the right side of my screen.
I took a deep breath….I clicked ‘Edit’ on the WordPress Preview screen, and….Oh my God!!
First, I saw my Page in the WordPress Editing view, with a title but no Content below it….hmmmm.…don’t panic yet!….so then… I clicked the ‘Edit with Thrive’ button that was there at the top, above the Formatting icons…. and Bingo! (or something) – da-daaaa! there it all was! He he he! It worked! My beginner efforts were still there, and still ‘editable’ again using The Thrive plugin options down the side of the screen. What a relief.
Some People Have Been Having Problems
It was a relief because, this morning I had been alerted by one of my readers, Chris, that some people were having problems with this plugin (thanks for letting me know, Chris). You see, yesterday, I had bought the plugin and downloaded it, was very excited about it and wanted to tell my readers about the special launch price. But, hadn’t yet had time to install it, activate it and take it on a test drive. So for an hour this morning, I had had this horrible feeling that I had been promoting this plugin….and it might not work. A potential disaster.
Well, all I can say is that I got it to work for me by using the above method. And I have never used a Content Builder of any sort before. There was nothing whatsoever wrong with the plugin – I just hadn’t worked out how to drive it properly. But once I did (in 20 minutes), it worked beautifully – no problem.
Here is the first Landing Page that I built: I know it’s pathetic, but it’s a start, and it shows that it did work for me, by following the steps that I explained above. I’m sure I just need more time to practice with the controls.
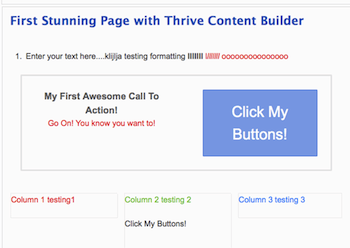
As you can see, it has 3 columns with text in each column, and a call to action box with a blue background, and white text….and no designing talent on my part. We all have to start somewhere (my excuse).
The Big Question: Should You Buy This Thrive Plugin?
I would say, Yes, buy the plugin, and here is why. There is a 30 day money back guarantee that Shane has specifically said again, he will always honor if it turns out that you are not completely satisfied with the Plugin, and you request a refund within the 30days.
So you have nothing to lose. It is a great Content Builder, and the first Content Builder that does not need any CSS or Short Codes to operate it, which is a huge advantage for non-geeks like me. For those of you who had doubts about deciding if you needed this plugin because of some difficulties that some people seemed to be having, I can reassure you that since its launch, it has had many updates which have made it much clearer and easier to tweak the editing options.
You do need a bit of practice to learn how to get the best out of it, but when I first tried this plugin in it’s first few days of launching when I first posted this article, I made a Landing Page of sorts in 20 minutes, the first time I tried. I’m sure that those people who had some problems with their Editing and Saving in the early days will have sorted out them out by now – or they will read this post and see how I did it, or they will work it out with a bit of practice.
Shane acknowledges that the Support tickets did build up a backlog at first. This was because of the huge numbers of new customers in the first 2 days of the launch. He apologized for the delay and gave support when needed, plus his Money Back Guarantee which he would always honor.
Conclusion
So, there you have my own experience, my explanation of how it worked for me at my first attempt, and my recommendations. Make your own decision about whether to buy the plugin for $49 or not – it really is not a huge investment – and if you do buy, and are not satisfied, ask for a refund, and you lose nothing. Personally, I won’t be asking for a refund because I know this plugin will be a useful tool that I will use many times over from now on.
If you have any views, or experience, tell us in the Comments below how you went. It’s always good to get many people’s opinions.

I purchased it yesterday, seems to work very well on my test run…Certainly a nice found for people that want to do some things outside the box so to speak.
Thanks for pointing this nice find out !!
Cheers,
Gary
‘Outside the box’ indeed! I like your style, Gary! There’s not enough humor in the Blogging world -it’s us against the world, I guess. Nevertheless, it’s the inside the box where this plugin really shines.
Pingback: Thrive Content Builder - The Best WordPress Plugin for 2014!
This is completely new thing I learnt about.I didn’t heard about it before today.I missed the discount launch but still interested to get it for my WP.You explained from the installation to its use very precisely so I think I won’t face anykind of difficulties with it.One more thing Spam Free WP seems to be very handy 😀
Hi James, I just posted an update to say that this plugin will be available again in a couple of days. I think you will like it!
Yes, WP Spam Free is great. Do you have Akismet on your site? You can get it free you know! Check out Get Akismet Anti-Spam For Free
That is really attention-grabbing, You are a very professional blogger. I’ve joined your rss feed and look ahead to searching for more of your excellent post. Additionally, I’ve shared your web site in my social networks
Thanks Durgesh!
Quite informative article. Lengthy but totally worth it.
Hey there, this plugin is looking useful. I wish to go for that but still want to wait and check for some user reviews down here in comments.
Hi Glenn, when I checked yesterday it still wasn’t available again post launch, I’m not sure why it’s taking so long.
It’s always a good idea to check reviews before spending money on anything, and I think you will see it will become a must-have tool for site owners who don’t have their own design team.
Will you be offering any discounts on the program anytime in the near future?
Not yet as far as I know. I’m sure there will be discount prices at some point but not at the moment.
Great article 😀
so amazing info and now u give me more exprince and any time come back here to make more info thank u very much ……
Thanks.
Thanks for the review. But my question is. Does the landing page plugin integrate with MailChimp? Awaiting your reply before I make a purchase
I’m not sure why you want The Thrive Content Plugin to integreate with Mailchimp, or any email autoresponder. Your landing page can include aSubscribe Form with buttons etc but you create that Subscribe form, inside Mailchimp with their software to create your email sequence.
Your new subscribers would access the Mailchimp form from your landing page that you build in the Thrive plugin, and then add/place your pre-made Mailchimp subscribe form into that Thrive landing page.
Don’t forget that you can always get your 100% money back from Thrive within 30 days of purchase, but I doubt that you would want to.
One plugin that does integrate with Mailchimp is the S2Member Plugin which is magic for building a list incredibly fast, well it does for me. Here’s a link to it : S2Member Automatic list builder plugin.